
A free AI-powered match EQ plugin for faster, more consistent mixes
If you’ve ever wished your mixes sounded as balanced and consistent as your favorite reference tracks, but didn’t want to juggle five different plugins to get there, this new free match EQ plugin was built exactly for that problem.
What this match EQ plugin actually does
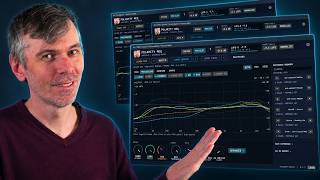
This plugin is called Polarity Match EQ. At its core, it’s a match EQ: it analyzes the tonal balance of a reference (like a finished track, a bus, or a stem) and applies an EQ curve so your current signal moves closer to that profile.
But instead of stopping at simple frequency matching, it also learns loudness, dynamics, and stereo information, then lets you carve space between tracks—all inside a single interface. And it’s completely free to download, with no accounts, serials, or iLok required.
Frequency matching with a single global control
The main idea is straightforward: you load or learn a profile from any source, then compare it to your current track or bus. The plugin shows both frequency curves so you can see where they differ, and then it generates an EQ curve to bridge that gap.
A global slider controls how strongly the match is applied. Pull it down if you only want a gentle nudge toward the reference, or push it up for a much tighter match. By default, it sits at 50%, which usually offers a natural-sounding middle ground.
Loudness matching built into every profile
Every time the plugin analyzes a source, it doesn’t just store the frequency distribution—it also captures loudness information. That includes metrics like short-term LUFS, so each profile remembers how loud that reference actually is.
When you load a profile, the plugin can then automatically match your current signal’s loudness to the target. This means you’re not just copying tonal balance; you’re also aligning overall level, which is crucial when you want different tracks or buses to sit in a consistent loudness range.
Dynamic EQ matching for evolving music
Most match EQs are static: they match an average curve and then stay fixed. This plugin goes further by also analyzing the dynamic range of the source across different frequency regions.
With the dynamics control, you can turn on dynamic EQ behavior based on that analysis. When certain frequencies in your signal exceed what the reference suggests, the plugin can push them down; when they’re too low, it can lift them up. You can:
- Set how many dB the dynamic EQ is allowed to move (for example, ±2 dB).
- Adjust how fast or slow it reacts.
- Turn dynamics off completely if you just want a static match.
This is especially useful because real music changes over time. Instead of forcing your track into a rigid shape, the plugin helps it follow the dynamic behavior of the reference.
Carve EQ: making space between tracks with sidechain
Beyond matching, the plugin includes a “carve” mode designed to help instruments stay out of each other’s way. A classic use case is bass versus drums.
You can feed a sidechain input (for example, your drum bus) into the plugin while it’s inserted on another track (like your bass bus). The plugin learns the frequency distribution of the sidechain signal and then, using a carve threshold control, applies an inverse EQ curve to your main signal.
In practice, this means you’re carving out the drum frequencies from the bass, helping them coexist without manual notch hunting. The clever part: this isn’t done with a second EQ. The carve information is merged into the same single EQ curve that handles matching, so you end up with one consolidated, static EQ result that includes both match and carve behavior.
Independent mid and side matching for stereo control
The plugin analyzes and matches the mid and side channels separately. In the display, you’ll see a dotted line representing the side information, letting you understand how the reference uses stereo width across the spectrum.
Because the mid and side are treated independently, you can shape not only the tonal balance but also how wide or narrow your mix feels at different frequencies. This is powerful on buses and on the master when you want your mix to sit closer to a particular genre’s typical stereo image.
All-in-one processing instead of plugin stacks
The design goal was to replace a typical chain of multiple plugins with a single, smarter tool. In many mixes, you might normally reach for:
- A spectrum or dynamic suppressor
- A match EQ
- A clipper
- A sidechain-based EQ to carve space between tracks
This plugin rolls those ideas together. It offers match EQ, dynamic matching, carve EQ, loudness matching, stereo-aware processing, and even a built-in PCM clipper that you can enable to keep peaks from crossing 0 dB.
Zero-latency mode for tracking and recording
High-quality, complex EQ curves can introduce noticeable latency—on the order of tens of milliseconds. That’s fine for mixing or mastering, but a problem if you’re playing instruments or recording vocals in real time.
To handle both scenarios, the plugin has two quality modes:
- Mastering mode with higher filter quality and more latency.
- Zero-latency mode with lighter filters but virtually no delay.
You can mix and tweak in mastering mode, then switch to zero latency while tracking. When you render the project, the plugin automatically goes back to the mastering-quality mode, so you get the best sound in the final export.
Shaping the curve with cuts and filters
On top of the generated match curve, you can still shape the result like a normal EQ. The plugin lets you apply low cuts and high cuts to trim unnecessary extremes and refine how the final curve behaves.
This is especially helpful on buses and the master, where you might want to keep sub-rumble under control or avoid over-brightening the very top end, even if the reference suggests more energy there.
Building and reusing profiles for your mixes
The top section of the plugin is where you learn and store profiles. You can analyze:
- Other songs you like
- Individual buses such as drums, bass, or music
- Different versions of your own mixes
Once learned, each profile appears in a reference browser on the right, ready to be recalled at any time. Every profile keeps its:
- Frequency distribution
- Loudness data
- Dynamic characteristics
This makes it easy to apply the same tonal and loudness targets across many projects.
Creating profile sets for consistent drums, bass, and masters
One of the most powerful features is the ability to group multiple profiles into a “set.” For example, you might analyze:
- The drum bus of a reference track
- The bass bus of another track
- The full master of a third track
You can then label each profile (drums, bass, master) and save them together as a set. Inside the plugin, these show up as folders—like a drum and bass or ambient set—with separate curves for drums, bass, music, vocals, and the master.
When you’re mixing a new song, you simply load the relevant profile for each bus: drums get the drum profile, bass gets the bass profile, and so on. This helps you maintain:
- Consistent loudness targets
- Similar dynamic ranges
- Predictable tonal balance across projects
Over time, this becomes a way to lock in your personal “house sound” or match a genre’s typical balance more reliably, similar to how some creators build workflows around AI agents to standardize their outputs, as in this AI-driven SaaS workflow.
Averaging multiple tracks into one style profile
You’re not limited to single-track references. The plugin can also combine several profiles into an average. For example, you could:
- Analyze the drum buses from ten different songs in the same genre.
- Select all those drum profiles in the browser.
- Use the combine function to create one averaged “genre drum” profile.
Repeating this for bass, music, and master gives you a set of averaged profiles that represent the typical sound of that style. Then, when you mix, you’re not chasing one specific song—you’re aligning with an overall genre standard.
This mirrors the idea of building reusable systems and templates seen in other AI workflows, like in multi-output AI agent setups, but applied to audio and mixing.
Advanced controls: gates, shifts, and key awareness
For more control, the plugin offers several advanced options:
- Apply gate: Sets a loudness threshold so very quiet frequencies are ignored when calculating the difference curve. This prevents noise or tiny details from skewing the match.
- Learn gate: Similar concept, but applied during the learning phase so only meaningful parts of the spectrum are captured.
- Shift: Lets you shift the profile curve along the frequency axis. This is useful when the reference and your track are in different keys—say the reference bass is centered around one fundamental and yours around another. Shifting helps align those fundamentals more logically before matching.
These controls don’t radically change the sound, but they fine-tune how the plugin interprets and applies the reference, especially in key-sensitive material like bass-heavy genres.
Exporting EQ curves as impulse responses
The plugin can export the static EQ curve (the green, non-dynamic part) as an impulse response file. The dynamic adjustments are not included—only the final static shape.
This is handy if you want to:
- Use the EQ curve inside another tool, like a convolution reverb or IR loader.
- Share projects with people who don’t have the plugin installed.
- Keep a DAW session limited to native devices while still preserving the tonal shaping.
You simply export the IR, then load it in your preferred convolution plugin to recreate the same static EQ effect.
Visual overlays and what to focus on
The interface lets you show or hide various overlays—profiles, current signal, sidechain, and so on—so you can declutter the view if needed. The processing overlay is usually the most important one, because it shows the actual EQ curve being applied to your audio.
By focusing on that curve, you can quickly see how aggressively the plugin is shaping your sound and whether you might want to dial back the global amount, tweak cuts, or adjust dynamics.
Formats, platforms, and installation notes
The plugin is available for Windows, macOS, and Linux in common formats such as VST3, CLAP, and LV2 (where supported). There’s no login, no license manager, and no paywall—just download the binaries and install.
On macOS, you may need to bypass the operating system’s security checks for unsigned plugins (the usual Gatekeeper behavior), since the plugin isn’t notarized with Apple’s paid developer certificate. On Windows and Linux, installation is typically as simple as dropping the files into your plugin folders.
Who this plugin is for (and who it isn’t)
This isn’t meant to be a “lazy button” that replaces all mixing decisions. Instead, it’s a tool for:
- Creating consistent tonal and loudness targets across many tracks.
- Quickly checking whether you’re way off in certain frequency areas.
- Speeding up bus and master balancing.
- Carving space between elements like drums and bass in a more systematic way.
If you still like to make creative EQ decisions by ear—but want a smarter, AI-assisted way to hit reliable technical targets—this plugin fits nicely into that workflow.
Used on drums, bass, buses, and the master, it can become a central piece in making your mixes sound more cohesive from track to track, without getting bogged down in repetitive manual matching every time you start a new project.




Comments
No comments yet. Be the first to share your thoughts!